In This Article
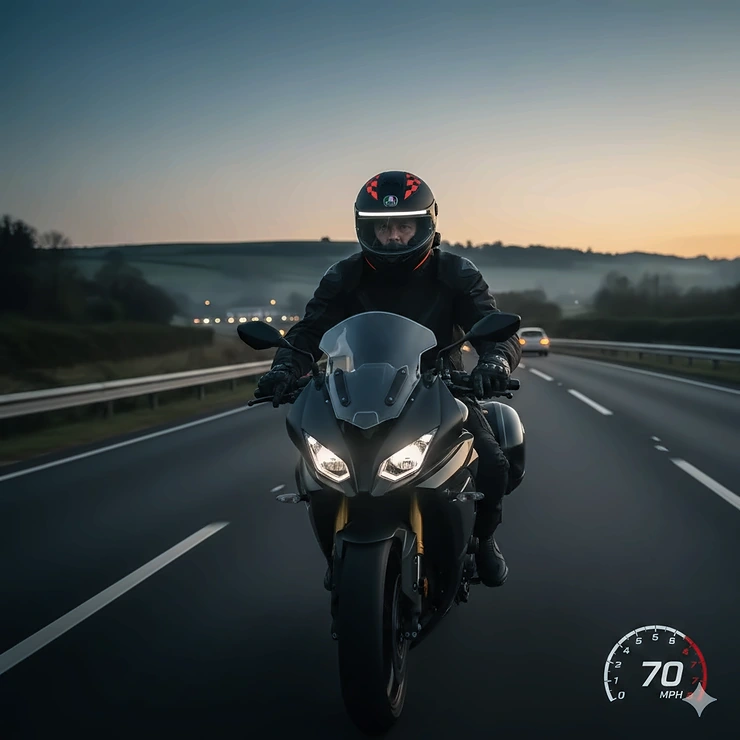
Picture yourself riding through a foggy London evening or navigating country lanes after dusk. You’ve got your high-vis jacket on, your bike’s lights are functioning perfectly, yet something’s missing. The truth is, other drivers often struggle to see motorcyclists until it’s almost too late. This isn’t just a feeling – it’s backed by sobering statistics.

According to recent GOV.UK data, 340 motorcyclists were killed in Great Britain in 2024, with the most common contributory factor being “driver or rider failed to look properly.” That’s roughly 6 motorcyclists dying every week. What’s particularly alarming is that motorcyclists are harder for drivers to spot on the road, making visibility enhancements absolutely crucial for survival.
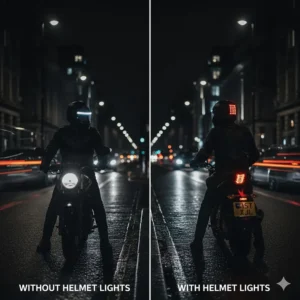
This is where motorcycle helmet lighting transforms from a nice-to-have accessory into potentially lifesaving equipment. By mounting lights directly on your helmet – the highest point of your riding silhouette – you’re placing warning signals at driver eye-level. This positioning makes you visible to not just the car directly behind you, but potentially up to six vehicles back in traffic.
Throughout this comprehensive guide, we’ll explore the 7 best motorcycle helmet lighting systems available on Amazon.co.uk in 2026. Whether you’re after smart brake detection technology, affordable LED strips, or turn signal capabilities, you’ll find detailed reviews covering specifications, pricing in GBP, and real customer feedback from UK buyers. We’ll also examine UK regulations, installation tips, and maintenance advice to help you make an informed decision that could quite literally save your life.
Quick Comparison Table: Top Motorcycle Helmet Lighting Systems
| Product | Type | Key Feature | Battery Life | Price (£) | Rating |
|---|---|---|---|---|---|
| MTSEEEN Smart Helmet Light | Smart Brake Light | Automatic brake detection | 8-12 hours | £57-£80 | 4.5/5 |
| Moman HLT1 | LED Brake & Turn Signal | Head-tilt turn signals | 24 hours | £12-£15 | 4.4/5 |
| Tuoservo LED Strip | Decorative Strip | USB rechargeable | 5000 hours | £17.99 | 4.0/5 |
| Universal Wireless Light | Wireless System | Transmitter module | 6-8 hours | £55-£65 | 3.0/5 |
| Brake Free (via retailers) | Premium Smart Light | 100 ultra-bright LEDs | 8-15 hours | £130-£170 | 4.8/5 |
| CHEOTIME LED Strip Kit | EL Light Strip | 3 lighting modes | 4-6 hours | £10-£14 | 3.5/5 |
| Riloer Bike Helmet Light | Front & Rear Light | USB rechargeable | 4-6 hours | £9-£12 | 3.9/5 |
💬 Just one click – help others make better buying decisions too!😊
Top 7 Motorcycle Helmet Lighting Systems: Expert Analysis
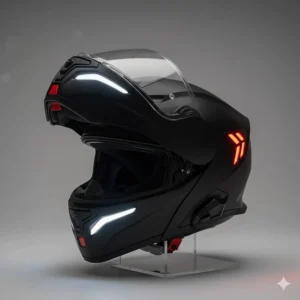
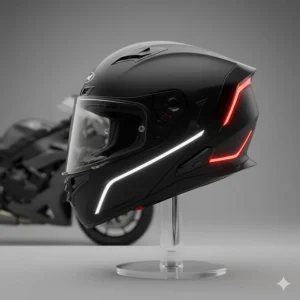
1. MTSEEEN Smart Motorcycle Helmet Light
The MTSEEEN Smart Helmet Light represents the cutting edge of motorcycle helmet lighting technology available on Amazon.co.uk. This sleek, aerodynamic device features advanced brake detection that automatically activates ultra-bright red LEDs whenever you decelerate.
Key Specifications:
- Automatic brake detection via accelerometer and gyroscope sensors
- 18 cm length, 140 g weight
- IPX4 waterproof rating
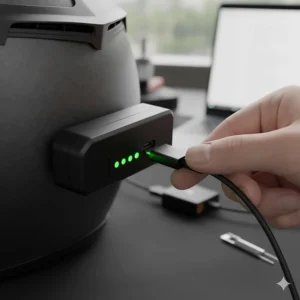
- USB-C charging with included cable
Measuring just 18 centimetres in length and weighing a mere 140 grammes, this light integrates seamlessly with most helmet styles without compromising comfort or aerodynamics. The IPX4 waterproof construction ensures reliable performance even during typical British drizzle and downpours.
UK customers particularly appreciate the plug-and-play design – simply charge it via the included USB-C cable, mount it using the adhesive backing, and you’re ready to ride. The intelligent sensors detect all forms of deceleration, including engine braking and downshifting, not just traditional brake lever actuation.
Price Range: £57.00-£80.00
Customer Feedback: British buyers consistently praise the excellent customer service and ease of installation. One reviewer noted: “Really pleased with this helmet light. The continuous modes with V-shaped patterns are decent, and when you slow down, the LEDs get very bright and are visible even on sunny days.”
✅ Pros:
- Smart automatic brake detection works brilliantly
- Highly visible even in daylight conditions
- Easy installation with adhesive mount
❌ Cons:
- Premium pricing compared to basic LED strips
- May not fit some ultra-compact helmet designs

2. Moman HLT1 Motorcycle Helmet LED Light
The Moman HLT1 offers impressive functionality at a budget-friendly price point, making it one of the best-value options for UK motorcyclists. This versatile system combines brake lighting with innovative head-tilt turn signals.
Key Specifications:
- 26 ultra-bright LED lights
- Automatic turn signals activated by 25-degree head tilt
- 150mAh rechargeable battery
- Micro-USB charging (1 hour charge time)
What sets the Moman apart is its clever turn signal system. Tilt your head approximately 25 degrees to either side, and the corresponding turn signal automatically activates for six seconds with an audible beep confirmation. Whilst this takes some getting used to – UK riders tend to nod at fellow motorcyclists, which can inadvertently trigger the indicators – it becomes intuitive after a few rides.
The system offers three smart modes: constant flashing for visibility, and left/right turn signals. With 24 hours of continuous use from a single hour of charging, battery anxiety becomes a non-issue for daily commuters.
Price Range: £12.00-£15.00
Customer Feedback: UK buyers highlight both the brilliant functionality and the learning curve. One detailed review mentioned: “Brilliant gadget with super bright red safety lights and yellow turn signals. The head-tilt activation works perfectly once you adjust to avoiding the nodding-at-other-bikers motion.”
✅ Pros:
- Exceptional value for money
- Impressive 24-hour battery life
- Turn signal functionality adds extra safety
❌ Cons:
- Head-tilt activation can trigger accidentally
- Lower build quality than premium options
3. Tuoservo Rechargeable LED Light Strip
For riders seeking style alongside safety, the Tuoservo LED Strip delivers eye-catching illumination in five vibrant colours: ice blue, green, purple, red, and blue. This decorative strip transforms your helmet into a glowing beacon whilst adding personalisation to your riding gear.
Key Specifications:
- USB rechargeable power supply
- 5000-hour service life
- Waterproof flashing strip design
- 3 lighting modes: always on, flash, phase flash
The installation process couldn’t be simpler – the strip features double-sided adhesive that bonds securely to your helmet without causing damage. When you eventually remove it, any residual adhesive wipes away easily with cleaning solution.
The controller allows seamless switching between three modes: constant illumination for maximum visibility, standard flash for attention-grabbing effect, and phase flash for a unique rhythmic pattern. Despite its budget pricing, the Tuoservo strip boasts an impressive 5000-hour lifespan.
Price Range: £17.99
Customer Feedback: French and UK Amazon buyers note the excellent value proposition, with one stating: “The price is very good and definitely makes you more visible on the road, which is always positive.”
✅ Pros:
- Five colour choices for personalisation
- Non-damaging adhesive installation
- Exceptional longevity (5000 hours)
❌ Cons:
- Produces slight operational noise
- More decorative than functional compared to brake lights
4. Universal Wireless Helmet Brake Light System
The Universal Wireless System offers professional-grade brake light functionality with a transmitter module that hard-connects to your motorcycle’s electrical system. This provides genuine wireless operation between your bike and helmet.
Key Specifications:
- Wireless connection between bike and helmet
- Brake and turn signal transmitter module
- Universal fit for all motorcycle brands
- Includes USB charging cable and installation guide
This system represents a middle-ground solution for riders wanting integrated brake functionality without the sophisticated sensors found in premium options. The transmitter module connects directly to your motorcycle’s brake circuit, wirelessly communicating with the helmet-mounted light to activate whenever you squeeze the brake lever.
Installation requires basic electrical knowledge to connect the transmitter to your bike’s wiring harness. Once set up, the system provides reliable brake light activation that’s synchronised with your motorcycle’s actual brake application.
Price Range: £55.00-£65.00
Customer Feedback: Reviews are mixed, with UK buyers appreciating the concept but noting occasional connectivity issues. The system works best for riders comfortable with basic motorcycle electrical work.
✅ Pros:
- True wireless brake light integration
- Works with all motorcycle brands and models
- Professional-looking installation
❌ Cons:
- Requires electrical installation on motorcycle
- Occasional wireless connection dropouts reported
5. Brake Free Helmet Light (Premium Option)
Whilst not directly sold through Amazon.co.uk, Brake Free products are available through UK motorcycle retailers and represent the premium end of motorcycle helmet lighting. This American company gained fame after their Shark Tank appearance and has since enhanced the safety of over 55,000 riders worldwide.
Key Specifications:
- 100 ultra-bright LEDs providing >180° light spread
- Patented accelerometer and gyrometer algorithm
- 8-15 hour battery life (depending on mode)
- USB-C charging (next-gen model)
- Fits helmet sizes XS to 4XL
The Brake Free system uses sophisticated sensory technology to detect all deceleration events – not just brake lever actuation. Engine braking, downshifting, and coasting all trigger the brake light activation, providing comprehensive coverage that mirrors your actual slowing behaviour.
What makes Brake Free particularly effective is its positioning. Mounted at the highest point of your riding silhouette, the lights sit at driver eye-level. Combined with the >180° light spread, you become visible to multiple cars behind you, not just the vehicle directly following.
Price Range: £130.00-£170.00 (from UK retailers)
Customer Feedback: Adventure Rider and other UK motorcycle publications praise the Brake Free for its build quality and effectiveness. One long-term reviewer noted: “I plan on buying extra mounts for other motorcycle helmets so I can use the Brake Free regularly. I see no significant downside to installing it.”
✅ Pros:
- Best-in-class brake detection accuracy
- Ultra-bright LEDs visible in full daylight
- Exceptional battery life in stealth mode
❌ Cons:
- Significant investment compared to alternatives
- Not as readily available on Amazon.co.uk
6. CHEOTIME 3-Mode LED Helmet Strip Kit
The CHEOTIME LED Strip Kit provides budget-conscious riders with essential visibility enhancement through a simple but effective EL (electroluminescent) light strip design. Available in multiple colours, this kit focuses on making you seen without breaking the bank.
Key Specifications:
- 3 lighting modes: steady, slow flash, fast flash
- Battery-powered (2× AA batteries, not included)
- PVC construction with waterproof rating
- 380mm × 35mm strip dimensions
This kit includes two long strips, two short strips, extension cord, battery case, and installation accessories. The straightforward controller allows mode switching on the fly, letting you adapt your visibility to changing conditions.
The installation uses double-sided tape that adheres firmly whilst remaining removable without damaging your helmet’s finish. At just 0.5mm thickness, the strips maintain your helmet’s aerodynamic profile.
Price Range: £10.00-£14.00
Customer Feedback: Value-focused UK buyers appreciate the affordability, though some note the battery-powered design requires keeping spare AAs on hand for longer tours.
✅ Pros:
- Extremely affordable entry point
- Multiple colour options available
- Simple installation and operation
❌ Cons:
- Requires regular battery replacements
- Less bright than rechargeable LED options
7. Riloer Bike Helmet Light (Front & Rear)
The Riloer Helmet Light provides dual front and rear illumination, making it ideal for adventure riders who venture off-road or cyclists who also commute by motorbike. This versatile option works equally well on bicycle and motorcycle helmets.
Key Specifications:
- Front white LED and rear red LED
- USB rechargeable battery
- 3 lighting modes per light
- IPX4 waterproof rating
Weighing very little and featuring simple Velcro attachment, the Riloer system mounts and removes in seconds. The front light provides additional illumination for checking maps or bike issues in dark conditions, whilst the rear light ensures you’re visible from behind.
The three lighting modes for each light (steady, slow flash, fast flash) provide flexibility to match your riding environment and battery conservation needs. USB charging means you can top up the battery from any standard power bank or computer USB port.
Price Range: £9.00-£12.00
Customer Feedback: UK buyers appreciate the dual-purpose design, with one noting: “Easy to install and pretty self-explanatory. Works for both my mountain bike and my motorcycle helmet.”
✅ Pros:
- Front and rear illumination
- Extremely portable and lightweight
- Works on both bicycle and motorcycle helmets
❌ Cons:
- Shorter battery life than dedicated motorcycle options
- Velcro attachment less secure at high speeds
Understanding Motorcycle Helmet Lighting: What Is It?
Motorcycle helmet lighting refers to auxiliary illumination systems mounted on motorcycle helmets to enhance rider visibility. These devices range from simple LED strips to sophisticated smart brake lights with automatic deceleration detection. Unlike traditional motorcycle lighting mounted on the bike itself, helmet lights position warning signals at the highest point of the rider’s profile – typically at or near driver eye-level – making motorcyclists significantly more visible to surrounding traffic, particularly vehicles approaching from behind.
Why Visibility Is Critical for UK Motorcyclists
The statistics paint a stark picture of vulnerability on British roads. Motorcyclists face a fatality rate 35 times higher than car occupants per mile travelled, according to UK government data. In 2024 alone, 340 motorcyclists lost their lives on Great Britain’s roads, with thousands more suffering serious injuries.
The most frequently cited contributory factor in fatal motorcycle collisions? “Driver or rider failed to look properly” – a finding that appears in both motorcyclist and other driver fault assessments. This reveals a fundamental visibility problem that standard motorcycle lighting alone cannot fully address.
Consider the typical accident scenario: a car driver approaches a junction, glances left and right, then pulls out directly into the path of an oncoming motorcyclist. The driver genuinely didn’t see the bike, despite the motorcycle having its headlight illuminated. This phenomenon, commonly known as “SMIDSY” (Sorry Mate, I Didn’t See You), accounts for a significant proportion of motorcycle accidents at junctions.
Helmet-mounted lighting addresses this visibility gap in several crucial ways. Firstly, positioning lights at head height places them directly in drivers’ natural line of sight when checking mirrors and blind spots. Secondly, the independent movement of the helmet creates additional visual cues – drivers notice the shifting light position, which triggers attention more effectively than stationary motorcycle-mounted lights. Thirdly, brake lights at helmet level become visible to multiple vehicles behind the motorcyclist, not just the immediately following car.
The Highway Code explicitly encourages enhanced visibility, stating that riders “could wear a light or brightly coloured helmet and fluorescent clothing or strips” for daylight riding, and should “wear reflective clothing or strips to improve your visibility in the dark” for night-time riding. Helmet lighting takes these recommendations a step further by providing active illumination that doesn’t rely on external light sources to be effective.
UK government research demonstrates that motorcyclists are particularly vulnerable during evening rush hour (16:00-19:00) when fading light conditions combine with heavy traffic volumes. This is precisely when helmet lighting proves most valuable, maintaining conspicuity as natural light diminishes.
Types of Motorcycle Helmet Lighting Systems
Smart Brake Detection Lights
Smart brake lights represent the technological vanguard of motorcycle helmet lighting. These sophisticated systems use accelerometers and gyroscopes to detect deceleration events automatically, activating ultra-bright warning LEDs whenever you slow down.
Products like the MTSEEEN and Brake Free employ patented algorithms that distinguish between normal head movement and actual vehicle deceleration. This means the lights activate during all forms of slowing – brake lever application, engine braking, downshifting, and even coasting to a stop. Some UK riders initially worry about false activations from regular head movement, but the advanced programming filters these out effectively.
The primary advantage of smart brake lights is their autonomous operation. You don’t need to remember to activate anything or perform specific actions – the system continuously monitors your riding behaviour and responds appropriately. Battery life typically ranges from 8-15 hours depending on riding conditions and selected mode, with modern USB-C charging providing convenient top-ups.
LED Strip Lights
LED strip lights offer the most customisable and affordable entry point into motorcycle helmet lighting. These flexible strips adhere to your helmet using either double-sided tape or Velcro, creating a distinctive illuminated outline that dramatically improves your visibility profile.
Available in numerous colours (red, blue, green, purple, ice blue, white), LED strips appeal to riders wanting to personalise their appearance whilst enhancing safety. Most systems feature three operational modes: constant illumination, standard flash, and rapid flash. The constant mode maximises battery life whilst maintaining visibility; flash modes draw more attention in heavy traffic situations.
Installation simplicity makes LED strips particularly popular with novice riders or those uncomfortable with more complex mounting systems. Simply clean your helmet surface, position the strip, and press firmly to adhere. Most quality strips use adhesive that bonds securely during riding but removes cleanly when you eventually want to reposition or replace them.
Battery life varies considerably between models. USB-rechargeable strips typically provide 4-6 hours of continuous operation, whilst battery-powered versions require regular AA or AAA replacements. Service life often exceeds 5000 hours for LED elements themselves.
Turn Signal Systems
Turn signal systems add directional indication capability to helmet lighting, addressing a specific visibility challenge faced by motorcyclists: making lane change and turning intentions clear to surrounding traffic.
The Moman HLT1 exemplifies this category with its head-tilt activation system. When you tilt your head 25 degrees left or right – a motion that naturally occurs when checking your blind spot before changing lanes – the system automatically triggers the corresponding turn signal. An audible beep confirms activation, and the signal runs for approximately six seconds before automatically cancelling.
UK riders need to adjust their usual head-nodding greeting habits when using these systems, as the friendly nod to a passing motorcyclist can inadvertently trigger turn signals. However, most users report adapting quickly, and the safety benefits of clear turning intentions outweigh the initial learning curve.
Some turn signal systems require handlebar-mounted wireless controls rather than head-tilt activation. These work similarly to standard motorcycle indicators but position the light signal at helmet level for enhanced visibility.
Combination Systems
Combination systems integrate multiple lighting functions into a single helmet-mounted unit. These typically include steady-burn rear lighting for general visibility, automatic brake lights, and sometimes turn signal capability.
The advantage of combination systems lies in comprehensive coverage through a single installation. Rather than mounting separate units for different functions, you install one device that handles all lighting needs. This reduces weight, complexity, and potential aerodynamic disruption.
Battery management becomes more critical with combination systems since multiple functions draw from the same power source. Quality units offer battery level indicators and provide 8+ hours of mixed-use operation. Many include power-saving modes that reduce brightness during steady-state riding whilst maintaining full intensity for brake activation.
How to Choose the Right Motorcycle Helmet Lighting
Consider Your Riding Environment
Your typical riding conditions should heavily influence your helmet lighting choice. Urban commuters navigating busy city streets benefit most from smart brake detection systems that provide constant, automatic warning signals. The stop-start nature of city traffic means your brake lights activate frequently, alerting distracted drivers in dense traffic.
Rural riders facing long, dark country lanes might prioritise LED strip lights for their exceptional visibility at distance. The constant illumination helps oncoming traffic gauge your position and speed more accurately. Combined with high-visibility jackets, LED strips create a highly conspicuous profile against dark rural backgrounds.
Motorway commuters should consider ultra-bright options with wide light spread. At higher speeds, following vehicles need maximum advance warning of your deceleration. Premium options like Brake Free, with their >180° visibility and ultra-bright LEDs, excel in these scenarios by alerting multiple vehicles simultaneously.
Helmet Compatibility
Not all helmets accommodate all lighting systems equally well. Full-face helmets typically offer the most mounting options, with large, smooth rear surfaces ideal for adhesive-mounted lights. The aerodynamic shell also provides some wind protection for mounted units.
Open-face and modular helmets present different challenges. The reduced rear surface area limits mounting positions, and exposed locations experience more wind force. Riders using these helmet styles should prioritise low-profile lights with exceptionally secure mounting systems.
Half helmets (popular with cruiser riders) offer minimal mounting surface and no wind protection. LED strip lights that conform to the helmet’s curvature work better than bulky brake light units. Alternatively, consider mounting systems that attach to helmet straps or retention systems rather than relying solely on adhesive.
Before purchasing, measure your helmet’s rear surface area and curvature. Compare these dimensions to the product specifications to ensure proper fit. Some manufacturers provide helmet compatibility guides showing successful installations on popular UK helmet models.
Power Source Preferences
Battery technology and charging convenience significantly impact daily usability. USB-rechargeable systems offer the lowest long-term operating costs and most environmentally friendly operation. Keep a USB cable in your desk drawer at work or in your garage, and topping up becomes effortless.
Modern USB-C charging provides faster recharge times than older Micro-USB connections – typically 1-2 hours for a full charge versus 3-4 hours. The reversible connector also proves more convenient during rushed morning routines when you’re late for work.
Battery-powered systems using AA or AAA cells provide longer continuous runtime – often 20-30 hours – but require carrying spares on longer tours. The advantage lies in instant power restoration when batteries die; the disadvantage is the ongoing expense and environmental impact of disposable batteries.
Some premium systems now incorporate solar charging panels. Whilst intriguing, UK weather patterns make solar less reliable than USB charging for most riders. Consider solar as a supplementary charging method rather than your primary power source.
Budget Considerations
Motorcycle helmet lighting spans from £9 budget options to £170+ premium systems. Setting a realistic budget helps narrow your choices without compromising safety requirements.
Budget tier (£9-£20): Basic LED strips and simple rechargeable lights. Adequate for occasional weekend riders or those wanting to trial helmet lighting before investing in premium systems. Expect shorter battery life, simpler mounting, and fewer features.
Mid-range (£20-£60): Smart brake lights with automatic detection, combination systems with multiple modes, and quality LED strips with robust construction. This price point offers the best value for regular commuters, providing professional features without premium pricing. Expect 8-12 hour battery life and reliable operation.
Premium tier (£60-£170): Top-tier brake detection systems with patented algorithms, ultra-bright LEDs, exceptional build quality, and comprehensive mounting hardware. Serious riders covering high annual mileage or those who’ve experienced near-misses due to visibility issues find the investment worthwhile. Expect 12-24 hour battery life and multi-year durability.
Remember that helmet lighting represents a safety investment rather than a fashion accessory. Even budget options significantly improve your visibility compared to no auxiliary lighting. However, more expensive systems typically offer brighter illumination, more reliable operation, and longer lifespan.
Weather Resistance Requirements
British weather demands robust waterproofing from any external motorcycle accessory. Look for minimum IPX4 water resistance, which protects against water splashes from any direction – essential for surviving typical UK drizzle and spray from lorry tyres.
IPX5 or IPX6 ratings provide additional protection against heavier rain and high-pressure water jets encountered during motorway riding in storms. Whilst not strictly necessary for most UK conditions, this extra margin of safety extends product lifespan and reliability.
Pay attention to sealing around USB charging ports, as these represent vulnerability points for water ingress. Quality systems include rubber port covers that seal tightly when not charging. Some riders apply a small amount of dielectric grease to USB-C connectors for added moisture protection.
Temperature resistance matters less in the UK’s moderate climate but becomes important for riders touring to continental Europe. Operating ranges of -10°C to +50°C cover virtually all UK riding conditions, whilst -20°C to +60°C specs accommodate Alpine tours and Mediterranean summer rides.
✨ Don’t Miss These Exclusive Deals!
🔍 Take your motorcycle safety to the next level with these carefully selected products. Click on any highlighted item to check current pricing and availability on Amazon.co.uk. These lights will help you create authentic visibility improvements your fellow riders will appreciate!
Installation Guide: Mounting Your Helmet Light Safely
Preparation Steps
Proper preparation ensures your helmet light bonds securely and performs reliably throughout its service life. Begin by thoroughly cleaning your helmet’s mounting surface using isopropyl alcohol (70% or higher concentration works best). This removes oils, wax residue, and contaminants that could compromise adhesive bonding.
Allow the cleaned surface to air-dry completely – rushing this step invites future failures. Whilst waiting, unpack your helmet light and familiarise yourself with all components. Most kits include the main light unit, mounting plate or adhesive pad, USB charging cable, and sometimes positioning templates.
Charge the device fully before first installation. This allows you to test functionality and ensures maximum battery life for your initial rides. Some units include protective films over LED arrays – remove these before mounting.
Check your helmet’s temperature. Adhesives bond most effectively when both surfaces sit at room temperature (15-25°C). If your helmet’s been stored in a cold garage, bring it indoors an hour before installation. Never attempt installation in freezing conditions or direct sunlight above 30°C.
Finding the Optimal Position
The ideal mounting position balances visibility, aerodynamics, and helmet compatibility. For most helmet lights, this means centring the unit horizontally on the helmet’s rear surface, positioned as high as practical without interfering with your head’s natural movement.
Many manufacturers include cardboard positioning templates showing the recommended placement. Hold this template against your helmet whilst wearing it, asking a friend to check that the light position won’t obstruct your vision or neck movement. Mark the corners lightly with pencil.
Consider your typical riding position. Sport bike riders adopt a forward-leaning tuck that angles the helmet differently than cruiser riders’ upright stance. The light should point rearward when you’re in your normal riding position, not when standing upright. Some riders find it helpful to sit on their stationary bike in full gear whilst checking positioning.
Avoid mounting over helmet vents, as these depressions create air gaps that compromise adhesion. Similarly, avoid areas with excessive curvature where the flat mounting plate cannot conform to the surface. The most successful installations use the helmet’s flattest rear section.
Mounting Process
Once you’ve identified the perfect position, the actual mounting process moves quickly. Remove the adhesive backing from your light’s mounting pad, taking care not to touch the exposed adhesive with your fingers. Align the unit precisely with your marked position – you typically get only one attempt for proper adhesion.
Apply firm, even pressure across the entire mounting surface for 30-60 seconds. This crucial step ensures complete contact between adhesive and helmet. Many installation failures trace back to insufficient initial pressure. Some experienced riders use a wallpaper roller or clean cloth to apply pressure across the mounting area.
After pressing, leave the helmet undisturbed for 24 hours before riding. This allows the adhesive to fully cure and achieve maximum bond strength. Resist the temptation to test the installation prematurely – patience here pays dividends in long-term reliability.
For Velcro-mounted systems, the process differs slightly. Attach the hook side to your helmet using the adhesive backing, following the same pressure application process. The loop side attaches to your light unit. This allows easy removal for charging whilst maintaining a secure connection during riding.
Testing and Adjustment
After the 24-hour curing period, perform comprehensive testing before heading into traffic. Put your helmet on and sit on your stationary motorcycle in your typical riding position. Ask a friend to walk around the bike at various distances and angles, confirming the light’s visibility from all directions.
Test all operational modes whilst wearing the helmet. For smart brake lights, practice emergency stops in a safe area to verify the brake detection activates correctly. For turn signal systems, practice the head-tilt motion until activation becomes natural.
Check for any interference with your helmet’s comfort or fit. The additional weight (typically 100-200g) should be imperceptible once you’re riding, but the initially unfamiliar feeling might require a short adjustment period. If the light causes discomfort or neck strain, repositioning becomes necessary.
Perform a test ride on quiet roads to assess aerodynamic impact. Quality helmet lights create minimal wind noise or turbulence, but poorly positioned units can whistle annoyingly at motorway speeds. Minor repositioning can eliminate these issues without compromising visibility.
UK Regulations and Legal Considerations
Current Highway Code Requirements
The Highway Code provides clear guidance on motorcycle visibility without specifically mandating helmet lighting. Rule 87 states that riders “could wear a light or brightly coloured helmet and fluorescent clothing or strips” for daylight riding. For night riding, Rule 87 recommends wearing “reflective clothing or strips to improve your visibility in the dark.”
Helmet lights align perfectly with these recommendations by providing active illumination that enhances visibility in all conditions. Importantly, no UK legislation prohibits auxiliary lighting on motorcycle helmets, provided the lights meet certain criteria.
According to GOV.UK guidance, all helmets worn on UK roads must meet British Standard BS 6658:1985 and carry the BSI Kitemark, or meet a European Economic Area member standard offering equivalent protection with appropriate marking. Adding external lighting cannot compromise these safety certifications or obscure required markings.
The Road Vehicles Lighting Regulations 1989 govern vehicle lighting requirements but don’t specifically address helmet-mounted lights. However, several principles apply: lights must not dazzle other road users, coloured lights visible from the rear should be red or amber only, and any flashing lights must operate at 60-120 flashes per minute unless part of an emergency vehicle.
Colour Restrictions
Choose rear-facing light colours carefully to avoid potential legal complications. Red lights are unquestionably legal for rear-facing visibility as they match standard vehicle brake light colours. Amber (yellow/orange) lights are likewise acceptable, commonly used for turn signals.
White or blue lights should face forward only, never rearward. White rear-facing lights could confuse following drivers about your direction of travel, whilst blue lights are reserved for emergency vehicles under UK law. Using blue lights when not authorised can result in prosecution.
Green and purple LED strips occupy a legal grey area. Whilst not explicitly prohibited for motorcycle helmet use, they’re uncommon enough that some traffic officers might question their legality during roadside checks. If choosing these colours purely for aesthetic reasons, red or amber alternatives provide equal visibility without potential complications.
The safest approach: use red for rear-facing brake lights and visibility lights, amber for turn signals, and white for forward-facing illumination. This conventional colour scheme ensures instant recognition by other road users and compliance with all UK lighting regulations.
Insurance Implications
Most UK motorcycle insurance policies don’t specifically address helmet lighting, meaning adding these accessories typically doesn’t require notifying your insurer. However, policy terms vary considerably between providers, so checking your specific policy wording or contacting your insurer directly provides certainty.
Some insurers view enhanced safety equipment favourably, potentially offering minor premium discounts for riders who exceed minimum legal safety requirements. Mention your helmet lighting along with other safety features (advanced rider training, secure storage, etc.) when discussing policy renewals.
Document your helmet lighting with photographs showing the installation and keep purchase receipts. In the unlikely event of a claim where the light unit sustains damage, this documentation supports replacement cost claims under your policy’s accessories coverage.
Consider declared accessories limits in your policy. Basic policies often include £500-£1,000 of accessories coverage, whilst comprehensive policies may offer £2,000+. Premium helmet lighting systems approaching £200 value should be considered when selecting appropriate accessories coverage levels.
Maintenance and Care Tips
Regular Cleaning
British roads distribute a generous coating of grime, salt, and road spray across all exposed surfaces. Your helmet light receives the same treatment, requiring periodic cleaning to maintain optimal performance.
Clean your helmet light every 2-3 weeks during regular riding, or weekly during winter when road salt becomes prevalent. Use a soft, damp microfibre cloth with mild soap solution to gently wipe the lens and casing. Avoid harsh chemicals, solvents, or abrasive cleaners that could damage LED lenses or weatherproof seals.
Pay particular attention to LED lens surfaces. Road grime and salt residue reduce light output significantly – a dirty lens can cut visibility by 30-40%. For stubborn deposits, soak with soap solution for several minutes before gentle wiping.
Inspect weatherproof seals and USB port covers during each cleaning session. These components protect internal electronics from moisture ingress. If seals appear cracked or port covers don’t close snugly, contact the manufacturer about replacement parts before water damage occurs.
Battery Management
Lithium-ion batteries (used in most rechargeable helmet lights) maintain optimal health through regular use and proper charging practices. Avoid completely draining the battery before recharging – lithium-ion chemistry prefers partial discharge cycles. Charge when the battery reaches 20-30% remaining rather than waiting for complete depletion.
Store your helmet light with approximately 50% charge if not using it for extended periods (more than 2 weeks). Completely discharged lithium-ion batteries can enter deep discharge states that permanently reduce capacity or prevent recharging altogether.
Extreme temperatures degrade battery performance and longevity. Avoid leaving your helmet with mounted light in direct sunlight or freezing garages for extended periods. If riding in very cold conditions, the battery may show reduced runtime – this is temporary and normal capacity returns when warmed.
Most modern helmet lights include battery management systems preventing overcharging, but unplugging once fully charged extends overall battery lifespan. Expect 300-500 full charge cycles (roughly 2-3 years of daily use) before noticing meaningful capacity reduction.
Adhesive Maintenance
Adhesive-mounted lights benefit from periodic bond inspection, particularly after several months of use. The heating and cooling cycles from riding, combined with vibration and weather exposure, gradually stress the adhesive bond.
Every few months, firmly but gently try to rock the light unit side-to-side whilst wearing the helmet. Any movement indicates weakening adhesion requiring attention. If caught early, simply applying pressure to the mounting surface for 30-60 seconds can reactivate the adhesive bond.
If significant movement develops or the unit begins lifting, remounting becomes necessary. Carefully remove the light, clean both surfaces thoroughly with isopropyl alcohol, and apply fresh mounting tape or adhesive pad. Many manufacturers sell replacement mounting hardware specifically for this purpose.
Velcro-mounted systems require different maintenance. The hook-and-loop connection naturally accumulates debris that reduces holding strength. Every month, remove the light and clean both Velcro surfaces with a stiff brush to extract trapped fibres and dirt. Replace Velcro pads annually for optimal holding strength.
Firmware Updates
Some premium smart helmet lights now include firmware update capability, typically accessed through USB connection and manufacturer-provided software. These updates improve brake detection algorithms, add new lighting modes, or fix identified issues.
Check the manufacturer’s website quarterly for firmware updates if your model supports them. The update process typically takes 5-10 minutes and requires a computer with USB connectivity. Follow provided instructions carefully to avoid corrupting the firmware.
Not all helmet lights support firmware updates – budget and mid-range options usually operate on fixed programming. However, the lack of update capability doesn’t represent a disadvantage for these simpler systems that perform reliably without requiring software modifications.
Common Problems and Troubleshooting
Light Not Activating
If your helmet light fails to illuminate, systematic troubleshooting identifies the cause quickly. First, verify the battery holds charge by connecting it to a USB power source and observing the charging indicator. No charging indication suggests either a completely depleted battery (requiring 10-15 minutes of charging before the indicator appears) or internal circuit failure.
For lights with manual power buttons, ensure you’re using the correct activation sequence. Some require holding the button for 3-5 seconds rather than a quick press. Others use double-press or press-and-hold combinations to prevent accidental activation in storage.
Check that protective films haven’t been left on LED lenses. Many new units ship with clear protective plastic that must be removed – a surprisingly common oversight that completely blocks light output whilst leaving the unit seemingly functional.
For smart brake lights, ensure proper mounting orientation. These systems contain motion sensors that must be positioned correctly to detect vehicle deceleration. Upside-down or severely angled mounting can prevent proper sensor operation.
Inconsistent Brake Detection
Smart brake lights occasionally exhibit overly sensitive or insufficiently sensitive activation. Overly sensitive units trigger during normal head movements or minor speed fluctuations. Insufficiently sensitive units fail to activate during gentle braking or engine braking.
Most quality systems include sensitivity adjustment, either through button presses (cycling through sensitivity levels) or smartphone apps. Reducing sensitivity stops false triggers from head movement; increasing sensitivity ensures activation during gentle deceleration.
Environmental factors can affect brake detection performance. Very hot weather (above 35°C) or very cold conditions (below -5°C) may temporarily alter sensor behaviour. If detection issues occur only during temperature extremes, this represents normal operation rather than a defect.
Mounting position significantly impacts detection accuracy. The sensor must align with your riding position – not your standing position. If detection seems unreliable, slightly adjusting the mounting angle (tilting the unit up or down by a few degrees) often resolves issues.
Adhesive Failure
Premature adhesive failure frustrates riders who’ve carefully followed installation instructions. Several factors contribute to early detachment beyond inadequate initial installation.
Helmet finish matters enormously. Matte-finish helmets provide less bonding surface than glossy finishes. Some matte surfaces incorporate anti-static or anti-fog coatings that specifically resist adhesive bonding. If experiencing repeated adhesive failures with a matte helmet, consider switching to Velcro-based mounting.
Helmet age affects adhesion quality. Helmets older than 3-4 years often have degraded surface coatings from UV exposure, repeated cleaning, and general wear. This degradation creates poor bonding substrates even when surfaces appear clean. Older helmets may require specialised adhesive promoters (available from automotive suppliers) for reliable bonding.
Temperature cycling causes expansion and contraction that stresses adhesive bonds. Helmets stored in garages experiencing large temperature swings (freezing winters, hot summers) face more adhesive stress than those stored in climate-controlled spaces. Consider removable Velcro mounting for helmets subjected to extreme temperature cycling.
Water Ingress
Despite IPX4 or higher ratings, some units develop water ingress problems over time. Early symptoms include fogging inside the lens, corrosion around connections, or intermittent operation after riding in rain.
Inspect USB port covers first – these represent the most common water entry point. Ensure covers seal completely and show no cracking or damage. Some riders apply a small amount of silicone grease around port cover edges for additional sealing.
Check the mounting interface for gaps. If the light unit doesn’t sit flush against the mounting pad across its entire surface, water can wick into internal spaces. Remounting with fresh adhesive and ensuring complete surface contact usually resolves these issues.
For severe water ingress causing operational failure, immediate action prevents permanent damage. Remove the light, disassemble if possible (many units use small screws), and place components in a warm, dry location for 48-72 hours. Some riders use silica gel desiccant packets or uncooked rice to accelerate drying. Once completely dry, many units resume normal operation.

Frequently Asked Questions About Motorcycle Helmet Lighting
❓ How long do motorcycle helmet light batteries typically last?
❓ Are helmet-mounted brake lights legal in the UK?
❓ Can I use helmet lights on bicycle and motorcycle helmets?
❓ How bright should motorcycle helmet lights be for effective visibility?
❓ Do helmet lights interfere with motorcycle electronics or communications systems?
Conclusion: Enhancing Your Safety Through Better Visibility
Motorcycle helmet lighting represents one of the most cost-effective safety upgrades available to UK riders. For an investment ranging from £9 for basic LED strips to £170 for premium smart systems, you dramatically improve your visibility profile on Britain’s increasingly congested roads.
The statistics we examined earlier paint a sobering picture: 340 motorcycle fatalities in 2024, with the primary contributory factor being “failed to look properly.” Whilst helmet lighting cannot eliminate all risks, it directly addresses this visibility challenge by positioning warning signals at driver eye-level – precisely where they’re most likely to be noticed.
Smart brake detection systems like the MTSEEEN Smart Helmet Light and Brake Free offer sophisticated automatic operation for riders wanting premium features and maximum brightness. Mid-range options such as the Moman HLT1 provide exceptional value with turn signal functionality, whilst budget-friendly LED strips like the Tuoservo deliver solid basic visibility for under £20.
When selecting your helmet lighting, prioritise brightness, battery life, and ease of installation appropriate to your riding patterns. Urban commuters benefit from automatic brake detection; rural riders need maximum visibility at distance; motorway riders require ultra-bright LEDs with wide light spread.
Remember that helmet lighting complements rather than replaces proper riding technique, defensive positioning, and high-visibility clothing. Think of it as one layer in a comprehensive approach to staying safe on British roads. Combined with quality protective gear, advanced rider training, and vigilant road awareness, helmet lighting significantly reduces your likelihood of being involved in a “SMIDSY” collision.
Installation takes less than an hour, maintenance requires minimal effort, and the peace of mind knowing you’ve done everything practical to stay visible is invaluable. Given the relatively modest investment required and the substantial safety benefits delivered, motorcycle helmet lighting deserves consideration by every UK rider serious about arriving home safely after every journey.
Whether you’re a new rider building your safety equipment arsenal or an experienced motorcyclist looking to enhance existing precautions, the seven helmet lighting options reviewed in this guide offer proven solutions suitable for all budgets and riding styles. Choose the system that best matches your needs, install it properly, maintain it regularly, and enjoy the added security of knowing you’re significantly more visible to the drivers sharing the road around you.
Recommended for You
- 7 Best Motorcycle Helmets UK 2026 | SHARP 5-Star Rated Guide
- 7 Best Lightweight Motorcycle Helmets UK 2026 – Expert Reviews
- 7 Best Motorcycle Helmets with Speakers UK 2026
Disclaimer: This article contains affiliate links. If you purchase products through these links, we may earn a small commission at no additional cost to you. Prices shown are approximate and may vary. All product information was accurate as of December 2025.
✨ Found this helpful? Share it with your mates! 💬🤗